Greetings all,
Note: this is an old post from the previous incarnation of this blog, now reuploaded The pictures are a bit rubbish but you get the idea..
[A few years ago now] GW undertook the re-branding and re-release of the classic terrain kit, the Warscryer Citadel (the Artist Formerly Known as Skullvane Manse).
Unfortunately, the family coffers are primarily drained by such minor concerns as food, shelter and toddler sized clothing, so purchasing it was out of the question (my birthday isn't until June and what are the chances that shiny-syndrome won't have diverted my attention elsewhere by then). The only option then, was to rummage around in the dark spidery fastness that is my gaming dungeon (read: garage) to see what recycled materials and bitz box goodies I could gather together for a scratch build project. I must say, now that its finished I'm rather glad I didn't just buy the kit; it was a lot of fun to put together and paint, and when I do eventually procure the actual model I can now happily cannibalise it for bitz without trepidation.
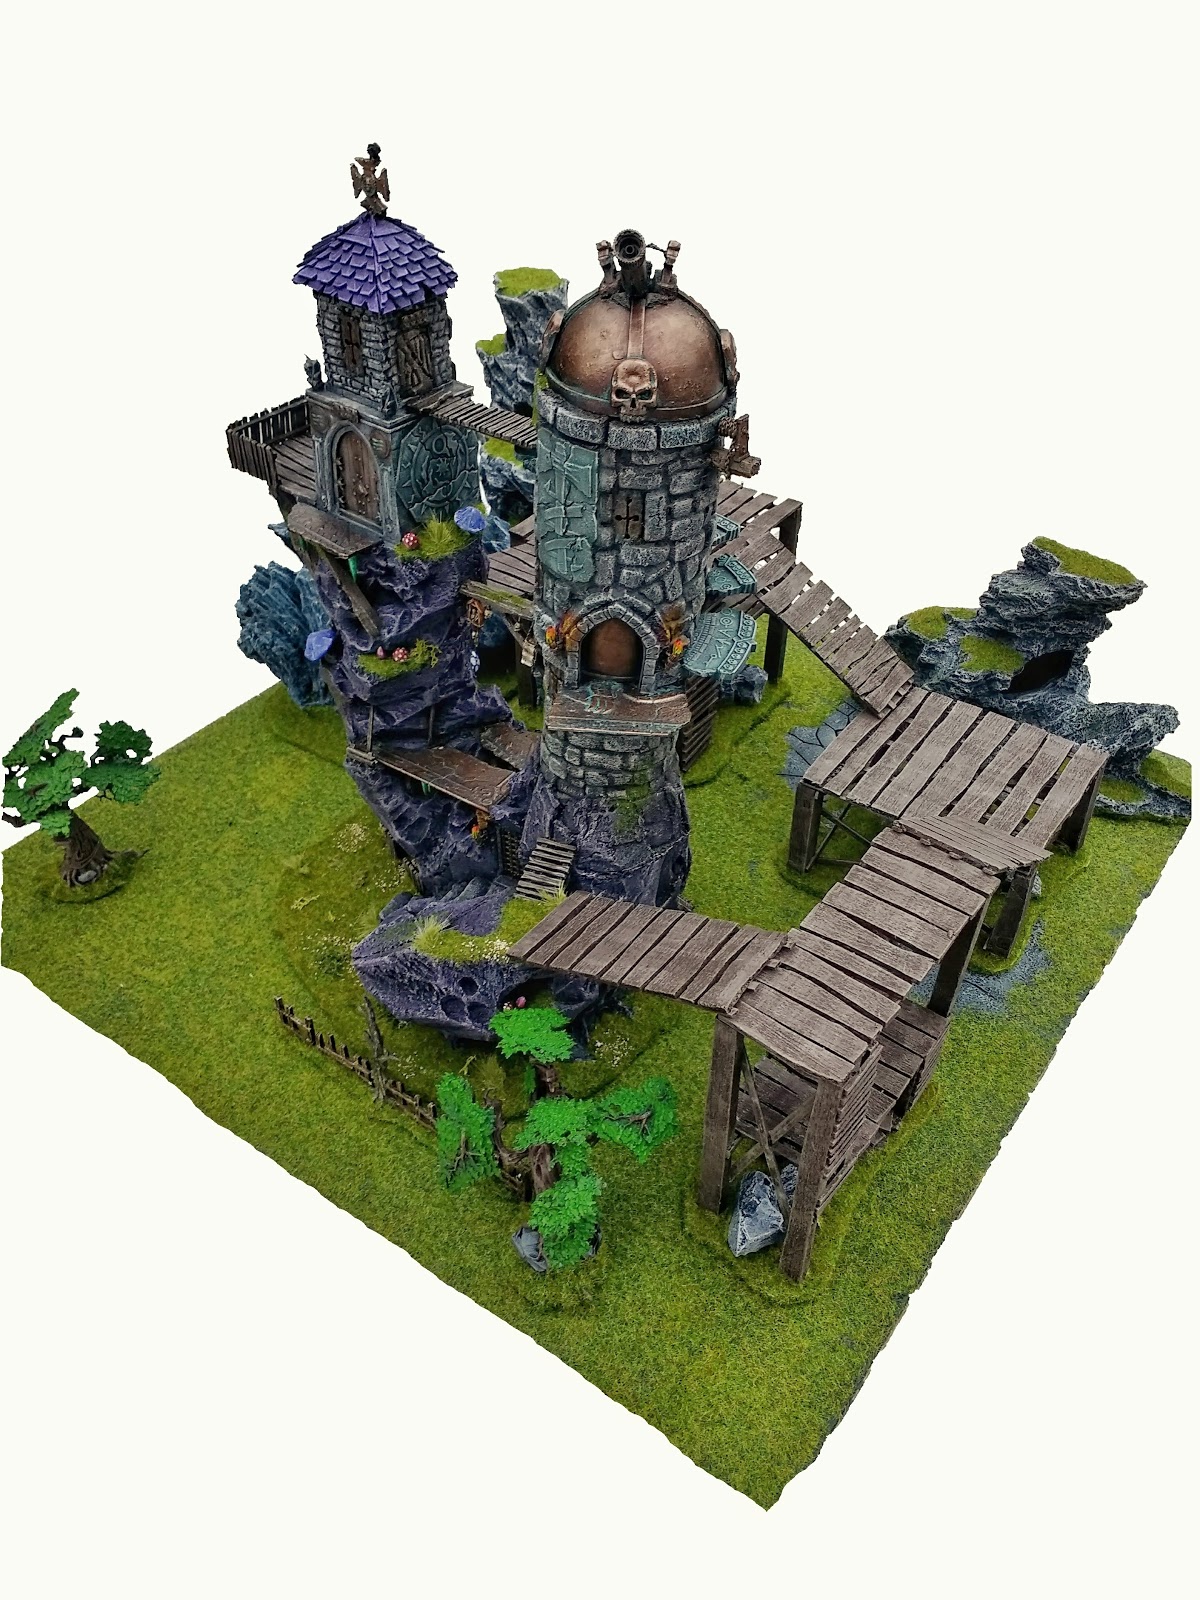
No-one on the internet likes a wall of text, so before we go any further here is the finished item, afterwards we'll discuss the journey to completion in detail. Oh, and if you don't give a fig how I made it and just want to see more pictures of it, scroll to the bottom for some goodies.
 |
| Look at that graceful grip and elegant curvature of the hand... I should audition for the Shopping Channel |
 |
| Did I say finished? I can't decide whether to paint spots on the large rear mushroom. Thoughts? |
At the outset I only the vague notion that I wanted to preserve the basic structural elements from the GW kit, these being; the whole edifice being rather precariously and unwisely built upon an erratic rocky outcrop, two adjacent tower sections one of which is topped with an astromancy observatory, some kind of winding and perilous walkway connections between both towers. I'm a really big fan of verticality and multilevel gaming boards too, so I wanted a couple of ledges which would provide modular connection points via walkways to other terrain features.
I began by rummaging through my gaming dungeon (garage) sourcing the materials needed to fulfill these basic requirements. I have an ongoing project to create enough rocky outcrops of various shapes and sizes to cover an entire 6x4' board, which involves using Hard As Nails adhesive to bond large chunks of insulation foam to recycled cork table mats and coasters. The mats/coasters you can pick up in the UK from pretty much any charity shop for a matter of pence, they are super useful for strong non-warping and above all cheap terrain bases. A small hacksaw cuts them into a more fluid and natural shape in seconds. The glue takes a day or two to properly dry, but gives a great bond and doesn't melt the foam as can happen with other options. You could use PVA but as it would have restricted exposure to air, it would take forever to dry, if at all. Because of my aforementioned project I already had a suitable block of foam based and ready to sculpt.
 |
| Always wear your aether mask when working with foam! |
<Warning: A quick word on working with foam. This stuff can be a serious health risk and you should take great care when working with it. Always wear a mask when cutting, sculpting, sanding it etc. it can give off toxic fumes when heated in any way (and will do so upon contact with superglue) and the tiny particles will have a right old go at your lungs given half a chance. On the plus side, at least in the UK; you can find it for free in just about any skip (US translation: debris box) outside a building site or house renovation. All my foam has been scavenged in this manner.>
Just like the original, I wanted one tower to be squared and the other to contrast by being more rounded. To achieve the latter I mustered up a couple of tubes from food packaging and a couple of more random items for the former. Another of my ongoing projects is the rebuilding of the entire 1980s Warhammer Townscape buildings in foamcore (post on that to follow soon), and it just so happened that a small and semi-completed construction from that set fitted perfectly on top of a cheapo pound-shop (US translation: dollar store ;-)) plastic toy i'd been hoarding. Note this; always keep your eyes open wherever you are, the keen terrain scratchbuilder sees materials everywhere!
 |
| Humble beginnings. Very humble. |
At this stage in a build you just need to add foam in vague blocks where you plan to carve features, make sure you add more than you intend to keep in order to give you some slack when hacking bits out (see pic above). Depending on the complexity of the piece, it can be a good idea to do a couple of rough sketches beforehand, so you have a clear idea of what you want to achieve. Once you have a good mental image of your objective, use a largish kitchen knife to slice up the foam until it has the basic rudimentary outline. then switch to progressively smaller kitchen/craft knives to add detail. The material is quite soft and when creating depressions of any sort you can actually just dig your fingers in and gouge out the foam after scoring it with your knife.
As you can see from the pic above, I used a few of the off cuts to glue around the base of the right hand tower in order to create the effect that it was built directly into the rock rather than simply plonked on top. The top of the observatory was finished off by adding the lower half of a plastic egg my daughter had grown tired of playing with (remember: hoard everything!).
 |
| I F***ed up cutting the tortilla tin, so had to draft in a coffee container lol |
You can make a pleasing rock effect by simply removing different sized wedges all criss-crossing across one another, just make sure there are lots of prominent edges to give your drybrushing something to catch onto. the beams supporting the various platforms were made by slicing balsa wood strips with a craft knife to add an irregular and more natural timber beam type effect. The brickwork on the foamcore structure was achieved by simply sketching it on with a ball point pen, then repeatedly going over the lines until the lines were etched deep enough for a wash to pool inside and drybrushing to catch the raised areas.
From this point on you will notice lots of little detailed bits popping up from various kits, games, sets, etc. I'm not going to list them all (but if you want to know what a particular bit is, just ask in the comments), but I'll simply repeat my advice of hoarding all the bits you get from other sets, terrain or otherwise. Of primary use for this project was the Shattered Dominion Basing Kit, which I can't recommend enough for adding a lot of useful ancient ruined fresco details to your creations. Other useful GW kits from which I saved bits include the Sigmarite Mausoleum, Arcane Ruins and Woods I also made frequent use of Renedra's palisade fencing, though you could easily carefully make all such bits from balsa wood (I just happened to have a bunch of them lying around). The lower doorway is from Mantic Games' Dungeon Doors pack.
Note: When it comes to sticking plastic to foam, best to use superglue in sparing quantities.


OK, so the bit of work which really brings this piece to life and gives it character is the stonework on the astromancy tower. This technique built upon my experience putting together a small circular tower (see previous post) using pre-cut foam blocks. I'd had a few ideas on improving my approach since then, in two main ways. firstly, I used a long bladed knife to slice each block length-ways to reduce the bulk of the finished structure (and also to double the value!), and secondly, rather than laying the blocks immediately adjacent to one another I left some quite considerable gaps. The whole surface was then smeared thickly with more Hard As Nails adhesive, before using a damp sponge to remove all the excess to create a nice mortar effect once dried. I also used a sharp pencil and a small rounded stone to scratch and weather the blocks - something which was missing from my original attempt and reduced the 'cartoony' feel of the finished piece.
You can approach this 'brick laying' technique in a number of ways. Some may prefer to arrange their blocks in a very neat and orderly fashion, I opted to make the whole much more haphazard and 'Warhammery'. Your choice. If you do go for the latter option, experiment with slicing your blocks to different thicknesses; the occasional protruding block adds a lot of character.
 |
| I left a nice ledge for connecting modular walkways at the base of the rear ladder |
 |
| The white metal details are from Firedragon. Check out my previous post for info |
 |
| The observatory was made from strips of card, Shattered Dominion basing kit bitz, foam and the lid and tip of an empty superglue! |
 |
| Any bitz-spotters recongnise that chain? |
 |
| Shattered Dominion basing kit arch parts propped up by balsa wood timbers |
 |
| Large mushrooms are cheap polystyrene florist things from a garden centre |
 |
| Smaller mushrooms are mixture of GW bits and cheap resin ornaments from China; search eBay for these. |
OK, so by this stage all the little details were added in and the piece was ready to be painted:
 |
| its not really visible on any pic, but there is a little cave opening at the base of the stairs with some Renedra barrels stored inside |
The first job was to undercoat the whole thing, which I did using a combination of spray and brush painting. For both I used the cheapest paint I could get away with. There's no point spending big bucks on early-stage terrain painting - just make sure whatever you use has a matte finish rather than a gloss one. Check out cheap hardware stores etc. for such materials rather than hobby or art shops.

If you are using sprays on a large area model make sure you do it outside... I undercoated my first four Realm of Battle tiles in the kitchen... yeah, not a happy wife as a result (there is still irremovable black on stuff many months later).

Given the large volume of stonework and natural rock on the model, drybrushing was the order of the day, lots of drybrushing. No mysterious approaches here, just the standard procedure of picking your base colour and working your way up with progressively lighter shades. Best not to get impatient here, it'll look better if you transition slowly, even though it can feel like to do so takes forever.
 |
| Drybrushing, 1st pass |
At this stage I was still using cheaper bulk paints than citadel or any other small volume pot. You'd go broke in a month if you used such paints on all your terrain!
 |
| Drybrushing 2nd pass. You can see where I began to experiment with using washes to colour the different stone/rock surfaces |
My approach with both this kind of terrain project, and also many miniatures, is to shade the whole model a tone or two lighter than I want the final piece to be, then use diluted inks/washes to add grime and tie the different areas together. In this instance I also wanted to use diluted washes to distinguish between the different stone surfaces, to prevent the whole model looking like a uniform grey blob. I coated the base rock in quite a strong purple tone to lend it a bit of a mystical quality. The spiral steps I coated in green and a very diluted brown ink was added to the masonry to reduce the white pop and add weathering.
 |
| Basecoat done! |
 |
All that remained was the bit that I really enjoy - adding the final details. I went for a weathered bronze for the other walkways, improvised platforms and the observatory mechanisms (using citadel shades finished off with a very restrained bit of Nihilakh Oxide). All the timber parts were very simply and quickly drybrushed up using Vajello browns and dirtied up with ink, the smaller wooden bits were picked out using Cote D'arms' Beasty Brown (that's the original Bestial Brown citadel paint from pack in the pre-Heresy days for all you other old-timers). I decided to finish a few of the various small mushrooms and stalactites in brighter shades to add a splash of colour to break things up. At this stage I also mixed up some diluted black ink and added it to all the mortar sections whilst simultaneously picking out prominent raised edges of blocks in pure white to increase contrast and and make the astromancy tower pop a little more. All the stone areas which had received a colour wash then got a final white drybrush, very lightly, to pick out the sharpest edges.
Finally, the whole thing was based up to match my verdurous Ghyran setting - lots of lush greens, grasses, bushes, mosses on the stonework, patches of growth on ledges, etc. All of the various basing materials are from Javis. There's loads of options out there these days, but I've used this company since my dad first took me into my hometown's local model shop and the nostalgia is strong. The exception is the long-length static grass; I get through this in such large quantities that I generally source it through eBay I tend to use a blend of spring and summer mixes as a rule.
Well, we started with the pics of the finished model alone, so lets end on a few pics of my completed Warscryer Citadel scratchbuild on a small 2x2 set up alongside a few walkways and other bits (several of which will be the focus of upcoming terrain posts). Many thanks for reading, if you want to know anything else or I didn't cover something properly then please pop a comment below and I'll be happy to answer. Also, if any readers are based outside of the UK and have a good suggestion where any materials I have mentioned can be best located, please pop that info in the comments section too for the benefit of others.
Until next time.
Mark
Instagram: @hippy_hammer


 |
| Spooky |
fantastic work! love the little story elements and attention to detail. Keep it up :)
ReplyDeleteThank you! :-)
DeleteReally inspiring stuff! Got me motivated to revisit some of my old scenery projects.
ReplyDeleteGreat news! Do you have an IG account? I'd love to follow your progress, if you don't I'd consider making one - there are so many fantastic and inspirational accounts producing terrain. :-)
DeleteThis comment has been removed by a blog administrator.
ReplyDeleteHey, I just purchased the original model for my D&D group and was just browsing for colour schemes when I came upon your Blog.
ReplyDeleteI recently built a pretty huge ship (out of styrodur) for that purpose, too, and your post is a wonderful inspiration for more props!
And judging from the pictures, it should be way below 85€ ;)
Thanks for the inspiration and for taking your time to write all this down!
Hi, glad it proved useful! I have a whole bunch more projects in the pipeline, will blog about each when life gives me chance!
DeleteIl be following your blog sir!
ReplyDeleteCheers Gerald, hoping I'll be upping the regularity of content starting this weekend ;-)
Delete